
Advertisement [ ? ]
Site Links
- Lease Calculator
- Advertise on 10,300+ pages
- My Car ongoing Review
- Members' Chat
- Cars For Sale
- Car Dealers
- Honda "Fit" Manual
- Hyperflex Bushings
- For Sale
- Fix your Car
- Car Manuals
- other manuals - Reference Materials
- DIY Repairs
- Articles
- Video
- Link with Us
- Search Help
- Code your Mac!
- Fly, race, anything R/C
- DIY repair guides
- Z-Seven
- Mechanic's Blog
- Free Files
Where is the thermostat and water pump located?
Car: Acura, Legend, 1992 - Back to Fix-It - Acura Legend Repair Manuals
Q.I have a 1992 Acura Legend w/ V6. Where is the thermostat and water pump located? Car is getting hot and I have noticed a small water leak under front of car.
thanks
Charlie.

AnswerThermostat is just below the throttle body:
Drain the cooling system and remove the lower radiator hose from the thermostat housing.
Remove the thermostat housing bolts, the housing and the thermostat.
Clean the gasket mounting surfaces.
To install, use new gaskets and reverse the removal procedures; install the thermostat's spring end toward the engine. Torque the housing bolts to 9 ft. Lbs. (12 Nm).
Refill and bleed the cooling system

Waterpump shown above with timing belt cover and timing belt removed. The water pump is behind the timing belt.
timing belt cover:
1991-93 Legend
Disconnect the negative battery cable.
Remove the engine wire harness covers at the front of the engine.
Label and disconnect the wiring harness.
Remove the breather pipe and vacuum pipe bracket.
Remove the alternator, air conditioning and power steering belts.
Remove the timing belt upper covers and turn the crankshaft pulley to the TDC No.1 cylinder mark.
Remove the crankshaft pulley.
Remove the air conditioner belt tensioner pulley.
Remove the dip stick tube and the lower timing belt cover.
To install:
Make sure the rubber seals and cover are clean and dry and install the lower cover.
Carefully oil the threads of the pulley bolt without getting oil on the washer. Install the crankshaft pulley and torque the bolt to 174 ft. Lbs. (240 Nm).
Use a new O-ring to install the dip stick tube.
Install and adjust the drive belts for the air conditioner, power steering and alternator.
Install the upper timing belt covers, breather pipe and the wiring harness.
timing belt:
1991-93 Legend
See Figures 8 and 9
Disconnect the negative battery cable.
Remove the engine wiring harness covers and the wiring harness from the front of the engine.
Remove the breather pipe and vacuum pipe bracket.
Remove the drive belts for the alternator, air conditioner and power steering pump.
Remove the upper timing belt covers.
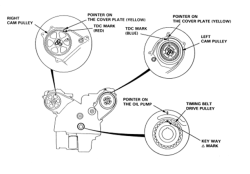
Rotate the crankshaft to TDC No. 1 piston. The white mark on the crankshaft pulley will be aligned with the pointer on the lower cover, and the camshaft sprocket marks will be aligned with the yellow marks on the rear covers.
Remove the crankshaft pulley and the air conditioner belt tensioner pulley.
Remove the dip stick tube. Remove the lower timing belt cover.
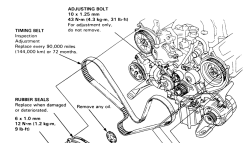
Loosen the timing belt tensioner pulley bolt about 1 / 2 turn and push the pulley to slacken the belt tension. Tighten the bolt and remove the belt. If the belt is to be reinstalled, mark the direction of rotation.
Do not rotate the crankshaft or camshafts with the belt removed. The pistons will contact the valves and cause engine damage.
To install:
If the belt is worn or oil soaked, it must be replaced. Find and repair the source of the oil leak before installing a new belt.
If the crankshaft or camshafts have been turned with the timing belt removed, remove the spark plugs and advance the crankshaft about 15 degrees beyond TDC of No. 1 cylinder. Make sure the camshaft sprockets are properly aligned with the marks and return the crankshaft to the TDC mark.
Install the belt in sequence on the crankshaft, adjuster pulley, the left camshaft, water pump, then the right camshaft.
To adjust the tension, loosen the tensioner pulley bolt about 1 / 2 turn. The spring will automatically set the proper tension. Torque the bolt to 31 ft. Lbs. (43 Nm).
Rotate the crankshaft 6 turns clockwise and check that the timing marks on the crankshaft and camshafts align properly. Adjust the timing belt tension again by rotating the crankshaft to the align the blue mark on the pulley with the pointer. Loosen and retorque the tensioner pulley bolt.
When installing the crankshaft pulley, oil the threads of the bolt without getting oil on the washer. Torque the bolt to 174 ft. Lbs. (240 Nm).
Installation of the remaining parts is the reverse of removal.
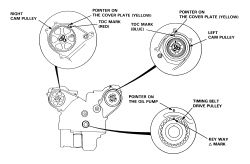
Fig. Fig. 8: Timing belt and cover assembly mounting-1991-93 Legend

Fig. Fig. 9: Timing mark positioning for timing belt installation-1991-93 Legend
water pump:
It is necessary to remove the timing belt cover(s) and remove the timing belt from the water pump sprocket, to remove the water pump on all models. This procedure can be found later in this section.
A small amount of weeping from the bleed hole in the water pump is considered normal and no cause for replacement.
Disconnect the negative battery cable. Remove the timing belt.
Drain the cooling system.
Remove the water pump-to-engine bolts and remove together with the drive sprocket.
To install, use a new O-ring and reverse the removal procedures. Torque the 6mm bolts to 9 ft. Lbs. (12 Nm) and 8mm bolts to 16 ft. Lbs. (22 Nm).
Answer Hi,
Here are better blowups:


Answer Hi,
If you are unsure of location of leak, you need to a cooling system pressure test. You can rent a tester from Autozone:
Hook it up in place of the radiator cap and pump pressure up to 15-18psi. Observe where leak is coming from to verify source before replacing any parts
>>Contribute your Answer<< - Submit your Question